 January 8, 2025
去年11月份用了三年的腾讯云服务器到期后,又趁着优惠买了两年的腾讯云,依旧是选择上海的服务器,但是带宽从8M下降到4M,考虑到我只用来部署 wireguard,预想中应该不会出什么问题,事实却教我做人,为此浪费了不少时间。
部署 wireguard 当然可以直接在 host 层面,但是手动管理配置文件比较繁琐,尤其在设备数量比较多的情况下,所以好几年前就实际在用 wg-easy 这个项目部署,有个前端页面进行在线设备的展示,以及新设备配置文件的自动生成,使用体验非常好,一句 docker compose up 即可部署完毕。
问题从换了部署服务器后出现了,配置文件没有更改的情况下,客户端到服务端的 ping 值异常的高,正常情况下应该是在 60 ms 左右 (北京-上海),但是在10分钟到数小时不等的时间后,这个延时会上升到 300+ ms,且此时 SSH 登录会卡死在下面这一步。
debug1: expecting SSH2_MSG_KEX_ECDH_REPLY
网络知识有限的我,也知道这个时候网络是通的,ssh 认证阶段出了问题。一番搜索找到 reddit 这个帖子,完全一样的问题,原因在于配置文件中 MTU 参数不对,MTU,全称 Maximum Transmission Unit,即最大传输单元,MTU 就是网络中能够传输的最大数据包大小,以字节为单位。MTU 的作用:
- 限制数据包大小: MTU 就像一个“门框”,只有小于等于 MTU 的数据包才能通过。
- 防止数据包过大: 过大的数据包可能会导致网络拥塞、丢包等问题。
- 影响网络性能: MTU 的大小会直接影响网络传输效率。MTU 设置过小,会导致数据包分片过多,增加网络开销;MTU 设置过大,又可能导致数据包无法通过某些网络设备。
华为关于 MTU 的解释,链接
按照帖子的操作测试获得本地网络的 MTU,注意 macOS 的 ping 命令和 Linux 存在差异:macOS 的 -D 标志等同于 Linux 的 -M do,都是设置 “Don’t Fragment” 位。macOS 的 -s 参数不包含 IP 和 ICMP 头部的 28 字节,所以如果要匹配 Linux 的大小,需要减去 28。
...
 August 11, 2022
原文地址:https://www.laroberto.com/remote-lan-access-with-wireguard/
本文中,让我们来看看如何使用WireGuard建立一个简单而安全的隧道(VPN)到你的本地局域网(homelab)。我们将采用VPS的方式,这样我们就不必向互联网暴露任何端口。
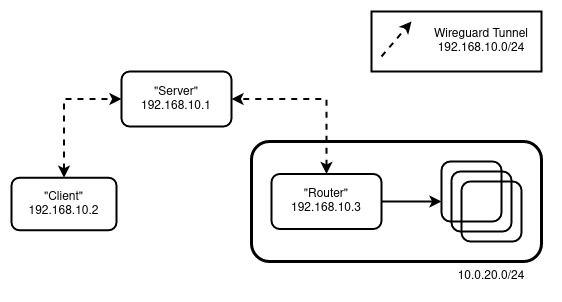
我们将模拟以下设置

角色:
- Router - 将作为你的局域网网关(向内)的机器。
- Server - 具有公网IP的机器,所有客户将连接到它,也被称为Bounce Server。
- Client - 你,试图在某个地方远程连接到局域网。
配置
#
注意:所有的机器都基于 Ubuntu,根据你选择的 Linux 发行版调整设置
Server 和 Router
#
对于Server 和Router执行以下操作
sudo apt update && sudo apt upgrade
sudo apt install wireguard
wg genkey | tee privatekey | wg pubkey > publickey
sudo sysctl net.ipv4.ip_forward=1
注意:要持久化 IP 转发,编辑 /etc/sysctl.conf,添加 net.ipv4.ip_forward=1
对于Server,创建 /etc/wireguard/wg0.conf:
[Interface]
Address = 192.168.10.1/32
ListenPort = 51820
PrivateKey = <Server's Private Key>

# Router Peer
[Peer]
PublicKey = <Router's Public Key>
AllowedIPs = 192.168.10.0/24, 10.0.20.0/24
对于Router,创建 /etc/wireguard/wg0.conf:
...
 January 25, 2019
内网穿透,又称 NAT 穿透,主要目的是为了访问位于 NAT 后的计算机。我的使用场景是访问位于实验室的机器,实验室网络环境为中国联通的 4G,这种情况下端口映射之类的方法是无能为力的,下面主要回顾一下自己用过的几种内网穿透方法。
SSH 端口转发
#
花样繁多,暂时没有搞清楚,待补充。
Zerotier
#
https://www.zerotier.com/
不需要公网服务器。
商业服务,免费用户有一定限制,但是可用。有跨平台的客户端,非常适合懒得自己动手的人。但是速度一般。
frp
#
https://github.com/fatedier/frp
需要公网服务器。
配置简单,样例丰富,稳定。个人使用体验非常不错,适合两个节点之间的连接。
WireGuard
#
https://www.wireguard.com/
需要公网服务器
开源,现代。组建好个人虚拟局域子网后,在此子网内的设备可以相互进行无感的连接,非常方便。
tinc
#
tailscale
#
基于 wireguard 的 mesh vpn 服务
magic dns
nebula
#
links
#
 January 24, 2019
在网上搜索 WireGuard 时机缘巧合发现的一篇非常不错的教程,之所以说机缘巧合,是先在知乎专栏发现了一篇机翻的文章,虽然机翻质量很差,但浏览发现确实是我需要的资料,遂找到原文翻译,光荣属于原作者 Stavros Korokithakis,glory belongs to Stavros Korokithakis :)。原文链接 How to easily configure WireGuard 以下是译文。
WireGuard非常棒!
最近你可能注意到了网络上关于 WireGuard 的口碑谈论。WireGuard 是一个非常简单的VPN,它使用最先进的密码技术。其口碑既来自于 WireGuard 本身的简单好用,也来自它将默认包含于 Linux 内核。Linus Torvalds 本人说他很喜欢 WireGuard,这在软件社区风靡一时,因为我们并不知道 Linus 居然能够表达爱或者除了憎恶之外的任何情感。
我在 WireGuard 使用中遇到的唯一问题是缺少文档,更准确地说是缺少预期的文档。快速入门指南提到了一个配置文件,但它从未告诉你应该如何编写这个配置文件,而且它还假设你比我更熟悉网络知识。
因为宇宙形成的初始条件决定了一切,所以 WireGuard 的文档终将不足,我将违背造物主向你展示如何轻松配置和运行它。我们开始吧!
简短概述
#
 一个看起来有点结实的守卫,确保你不会下意识地觉得这个帖子干燥无聊。
WireGuard 的核心是创建从一台计算机到另一台计算机的接口。它实际上不能让你访问网络任何一端的其他计算机或通过 VPN 服务器转发所有流量,或类似的任何内容。它只是直接、快速且安全地连接两台计算机。
要做除此之外的任何事情,你需要为它配置网络,而这并不再 WireGuard 文档的范围内,但就 VPN 来说这很重要。幸运的是,WireGuard 附带了一个帮助脚本wg-quick,几乎可以满足普通用户的所有需求。注意 wg-quick的配置文件与wg可执行文件不兼容,但我们只需要wg-quick,所以不用担心这个。
让我们开始设置一切。
安装和设置
#
要安装 WireGuard,请参阅安装页面,它应该非常简单。安装后,你需要为访问 VPN 的每台计算机生成一个私钥和一个公钥。由于 WireGuard 的设计,一个链接两端的计算机都需要拥有对方的公钥。
让我们生成这些密钥。在位于 VPN 中的每台计算机上,创建目录 /etc/wireguard/,并在每台计算机上刚刚创建的目录中,执行这些命令:
$ umask 077  # This makes sure credentials don't leak in a race condition.
$ wg genkey | tee privatekey | wg pubkey> publickey
这将在每台计算机上生成两个文件privatekey和publickey 。publickey文件用于告诉全世界,privatekey文件是秘密的,应该保留在生成它的计算机上。
...

 一个看起来有点结实的守卫,确保你不会下意识地觉得这个帖子干燥无聊。